Planning and Design Part 2
This is Planning and Design Part 2 of however many it takes to do right by the subject, or until I get tired of writing about it.
When We Last Left Our Hero
…he was off chasing another rabbit. As I mentioned at the end of Part 1, I had to account for something I hadn’t previously thought of including in the design. Going back to a prior step is not at all uncommon in the planning and design phases of a project. In some projects, the designing doesn’t stop until just before project completion. This is called design/build in the construction industry.
For example, let’s build a hotel. There’ll be an initial design that is enough to get the site prepared and a foundation (maybe) completed. While that site work is going on, the lower floors will be designed. This would mainly involve the floor plan, but you also have to consider how the building stays up, where to put electric and plumbing chases, yadda, yadda, yadda. And, oh yeah, we have to redesign the foundation so we can do this really neat thing on the tenth floor. And around and around it goes, only stopping when they run out of money to change it “just one more time.”
Circling Back
And that’s the point I now find myself at: redesigning the foundation, or interior framing in my case. Thankfully, I can solve the milk crate location problem with an operational solution and can now get back to the post at hand…
Part of the muddle in planning and design is that there is no clear boundary between the two. It’s kind of an organic thing to have your brain just float around while considering “everything.” In this case, “everything” includes the design criteria, the space itself, materials, and how it will all fit together. Sometimes it is difficult to just get started. In this case, I was lucky enough to have an anchor. The primary factor driving the final layout of the camper interior is that storage comes first. We have to be able to fit ALL of the basket booth stuff in the camper, somewhere. So, that’s what I started with.
(BTW, I could have used software to design the camper interior, but decided against it. If I were to start doing camper conversions as a business, then I can see using the design software. But this is a “one off” design so I just went old school: pen, paper, ruler.)
On with the Design
Since I knew what I wanted to do, I had to decide where to start, i.e., which part of the camper interior to design first. Once again, the anchor was the answer. Since I already had the bins, tables, etc., it was a simple matter of taking them out to the camper and seeing how they might fit together.
One of the things I inherited from my mother is a great sense of spatial awareness. Someone once told me that nobody could pack the trunk of a car better than my mother. She made everything fit and I have that knack, also. So, after pushing the booth stuff around the camper for a while, a design eventually emerged.
I started on the right side rear corner of the camper, looked at what I needed to put in, looked at the space, thought a bit, chose another spot, and repeated the process until everything fit. Admittedly, this is the part of the process that is not easy to describe (and provides a little job security, too). This all happens in my brain and I certainly can’t explain the process; it just happens. I eventually came up with this plan:

And after a little more head scratching I came up with the following framing plan:
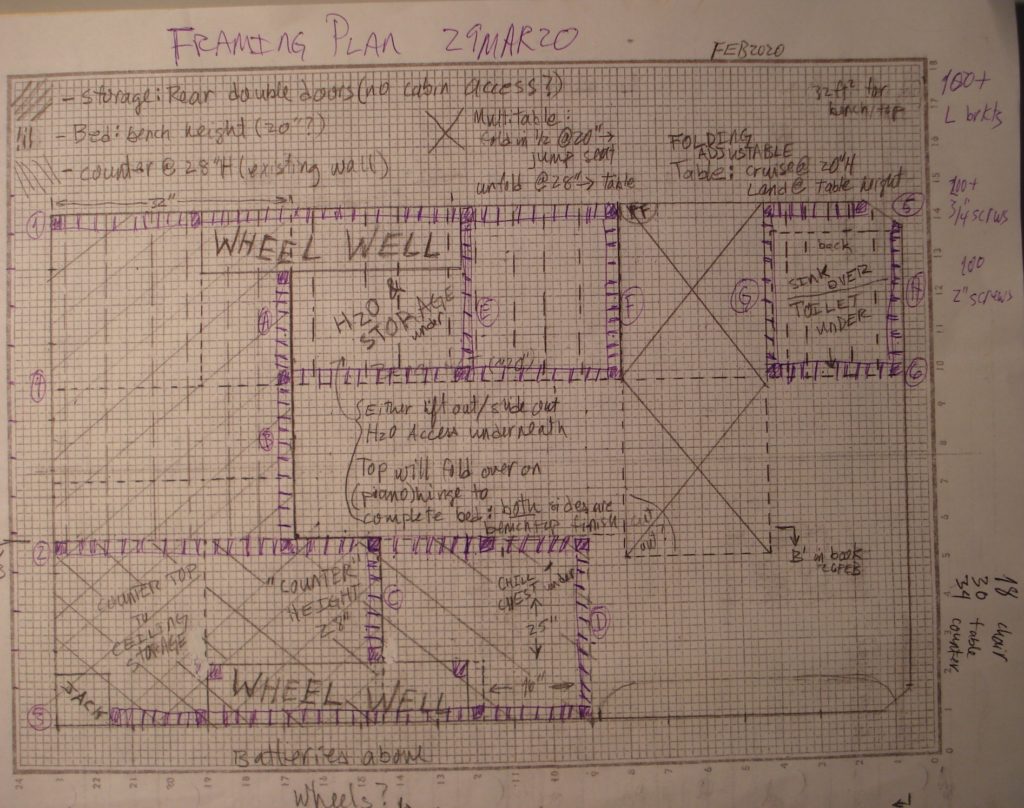
Of course, I don’t expect you to be able to make much sense out of these two plans. So, yeah there’ll be more about planning and design…
Next time
And that concludes Planning and Design Part 2. At least I can try to explain the two plans in a future post.