Tape falls firmly into the adhesive family of tools. And as with most adhesives, there will be some you like, and some you don’t like. A specific tape may work great for one person, but not so much for some one else.
One of the best descriptions of tape ever is Buzz Lightyear’s in Disney’s Toy Story. He called it a “unilateral bonding strip” (or UBS, for short), which is exactly what it is. A UBS is unilateral because it’s meant to apply force in one direction, along its length. Tape is pretty versatile when it comes to how it does the bonding, too.
Kinds of Tape to Choose From
Arguably, the tape that gets the most attention seems to be duct tape. I used to be a fan of duct tape, the one 3M made in the late 1970s. But soon after that it seemed that everybody and their brother started making and selling their own version of “duck” tape. All those cheap knock offs flooded the market and (IMHO) gave that early 3M product a bit of a bad name. Since then, I’ve gotten really picky about the roll I reach for. I do have a black roll of 3M duct tape that doesn’t have as much “stick” as I remember from that earlier product. While it does have some uses, I don’t rely on it for its adhesive strength; it’s too easy to take off.
My “go to”, however, is gaffer tape, which I discovered as a stage manager for a local community theater company. I’ve found this stuff has many uses in the theater, mostly to “spike”, or mark, certain spots on the stage. This could be the spot an actor needs to be on so the lights hit them just right or to mark where a set piece has to be moved to. This tape can take some abuse, too. I do the spiking during the rehearsals, weeks before the show opens. I replace the spikes just before the show opens, just to keep things fresh.
A Little More on Gaffer Tape
Gaffer tape comes in all kinds of colors (even glow in the dark yellow) and widths. Be forewarned that the three and four inch wide rolls take a little effort to get off of the roll, but it, too, has its uses. During the shows, I’ve found a gaffer UBS to be good for quick costume repairs when I can’t find the costumer. Furthermore, gaffer tape has the strength I remember from that old 3M product, but comes off a lot cleaner when you have to take it off.
Many More Kinds of Tape
Nowadays, I’m a bit of a tape connoisseur. I’ve used it for all kinds of different repairs. I even have a nylon ripstop tape for things like sleeping bags and other fabrics. One specialty UBS I’ve used is a waterproof tape…
A Project
Once upon a time, I had to replace the two basement windows in my house. Originally, they had been single pane glass and opened. I didn’t worry about them until we had the pool removed. The in-ground pool was within thee feet of the back of the house and there was a concrete deck around the pool which partially covered these windows. I think pools are more trouble than they are worth. So, when the deck started to collapse, we got rid of the pool before someone got hurt. Now we have a nice big backyard with lots of grass and I had to do something with the, now exposed to the elements, basement windows.
A Bit About the Design
Since I can now throw a ball around the back yard for the dog, the new windows had to be plexiglass so they wouldn’t break when the ball hits them. Also, I wanted the window as a whole to absorb some of the energy when the ball hits it. Because of this, the window couldn’t be held rigidly in its frame. After throwing all the design criteria into my brain, I wondered if Amazon sells waterproof tape. And, of course, they do!
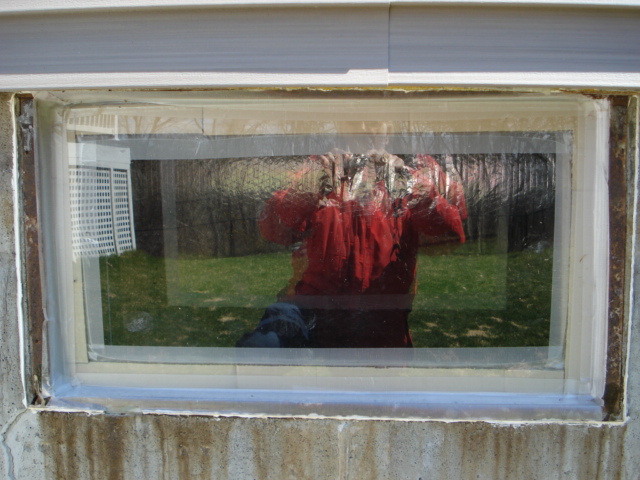
Since I didn’t want the plexiglass to touch the window frame, I cut it to be a little bit smaller than the window frame. I then used cardboard strips as a cushion between the window frame and plexiglass, just to provide a little more shock absorption and draft protection. The waterproof tape “attaches” the window to the frame with just enough play in it to allow the window to move when the ball hits it. This way the tape along all four edges actually absorbs most of the energy from the ball hitting the window. So far, there’s been no breaking or cracking of the plexiglass.
In addition, the tape along the edges is meant to keep rain, snow, and wind out. I actually used two layers of tape along each edge. The first one is supposed to do most of the work keeping the window weathertight. The second (or outer layer) I intended to be “sacrificial.” I’m expecting to replace it in the future when it starts to peel off. You can see the two layers in the detail picture below. So, after one (rather mild) New England winter, the outer layer is doing fairly well. I don’t think I’ll have to replace it this Spring, but I’ll keep an eye on it.
How It Turned Out
As you can see from the photos below, I don’t really care how the windows look. They are on the back of the house and no one sees them much; certainly not enough to care about how they look. The weather is kept outside where it belongs, so design successful.


Stay tuned for more In the Toolbox posts…

